
Cinemagraph/Subtle GIF Tutorial
- by Anthony
- in Digital Art
- posted May 4, 2011
I never thought I would make an animated GIF but here I am. After first seeing their potential beauty here: http://iwdrm.tumblr.com/ I decided that I needed to make one. I am not sure how the original creator ( or others for that matter ) make their own but this tutorial will explain how I got the image above (approximately after about 2 hours of shooting and editing):
Well having capable software is what really helps this be painless. I am sure there are alternatives but I used the following supplies and software for the following reasons:
- camera that can take some decent quality film ( I used a small handheld )
- a tripod to keep shot as steady as possible ( I used a small gorillapod )
- Adobe Premiere Pro ( to import film and export to frames )
- Adobe Bridge ( to import all files into a single Photoshop file painlessly )
- Photoshop ( to make the GIF )
And here is a summary of the basic steps to creating this effect before getting into the details:
- capture movement on video ( keep subject and camera as still as possible )
- export the individual frames as images from the film ( I used Premiere )
- import the frames into Photoshop as layers
- basically group all frames but the one (this one should be base layer) you want to represent all elements in the background
- put a mask on the group of images(not including base layer) to cover all but the area you want movement
- And finally create and export your GIF
Step 1:
First you want to get as steady a shot as possible while having something moving. This is where the camera and tripod come in handy. You will want the subject as still as possible; but you also want movement! … so basically something like a slight wind is helpful here ( I was lucky there was some that wasn’t too powerful). I am sure the more creative out there could come up with some other options in this respect.
Step 2:
Second you want to make sure you capture a lot of film ( and from many different angles). This is important enough to be its own step as far too often I have taken the “perfect shot” only to later find out it was out of focus, or ruined in some other manner. Definitely an important rule of photography I don’t want any to miss, even though this not technically photography.
Step 2:
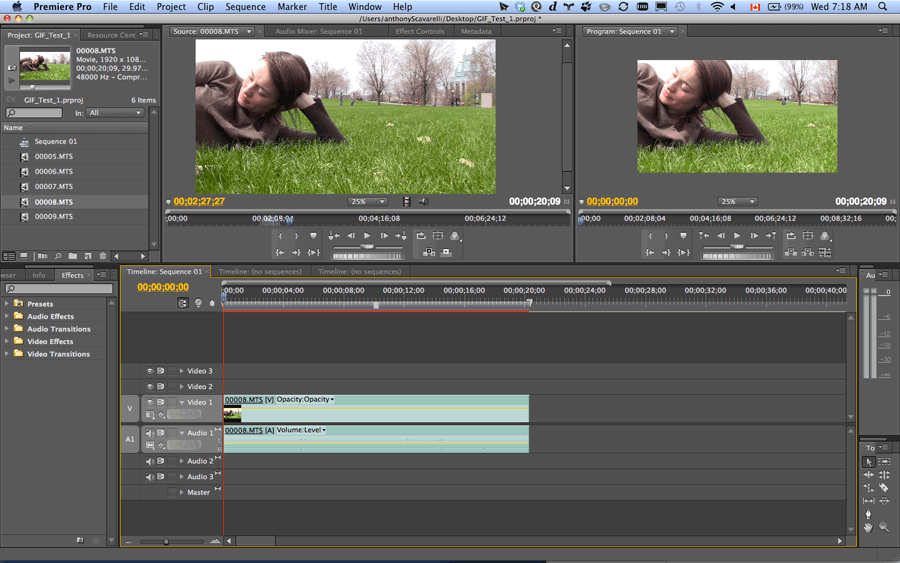
Import film into a video editing program such as Premiere. In Premiere that involved selecting and moving[setting in and out points and dragging] only a small the part of the video I wanted to the main timeline.
Step 3:
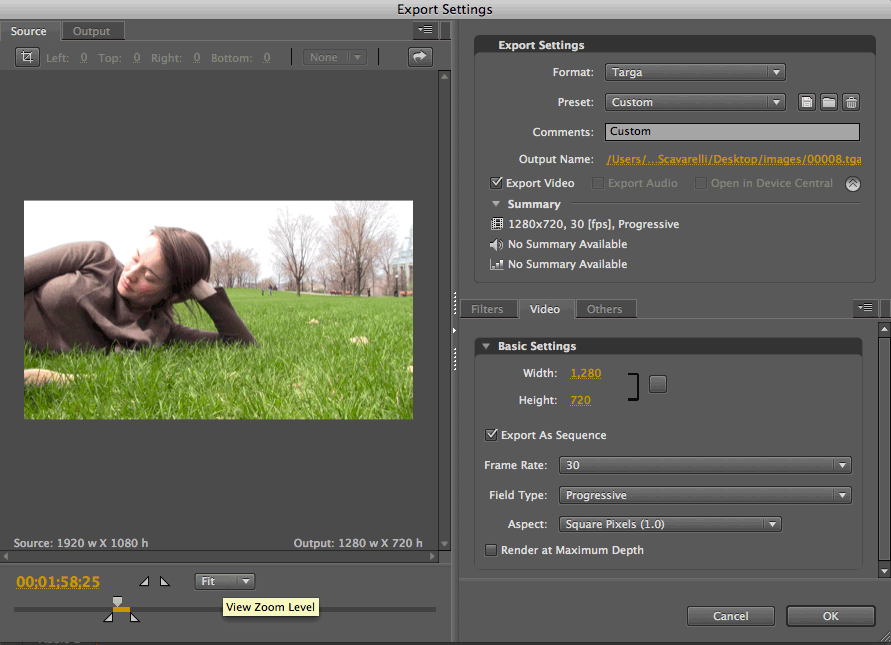
Now you must export each frame as an image into a folder. Go to File > Export > Media and the following image are the settings I used ( I used targa as it it a lossless — non-compressed — image). Make sure you set the input to an empty folder that you want to contain all your images.
Step 4:
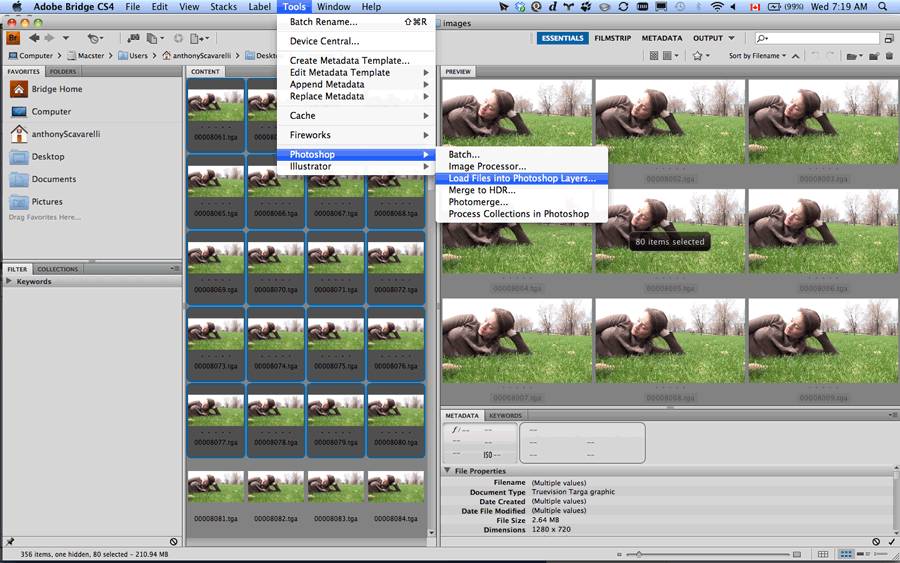
Shift-Select all the frames from the folder you exported them all to folder using Adobe Bridge. Then from the menu select Tools > Photoshop > Load all files into Photoshop Layers … This helps save a great deal of time importing every image separately into a Photoshop file. I selected about 80 or so images to be able to sort through. Photoshop should now open automatically and starting loading all files into layers …
Step 5:
Now that we have everything into Photoshop we can finally get to the good part! First we want to select a suitable background image ( the base image that will never change ) and move it into the base layer ( perhaps even lock it as well ). I chose mine based on a few arbitrary requirements: Namely attractive composition, and I wanted to solidify the image as a still image and thus chose a layer with some people in midstep [see background top-right].
Tip: Holding down alt and selecting the visibility icon on each layer hides all expect the one you selected. Doing so again to the same layer goes back to showing all.
Step 6:
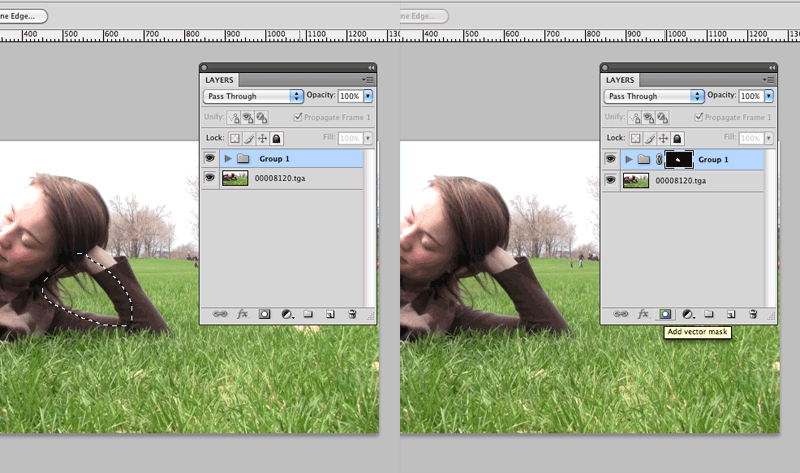
Next step, again for arbitrary convenience, is to group all other layers into a single group so that a single mask can be applied to all. I did a rough selection with the lasso tool then hit this button in the layers menu.
Step 7:
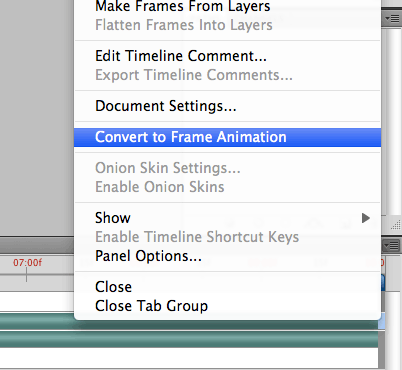
Now to create the GIF. Open up your animation window by going to Window > Animation . From here select the fly-out menu to change the default ( well in CS4 anyhow ) timeline option to the Convert to Frame Animation view. This following image illustrates:
After this you want to create your GIF. Hit the new frame button then select which layers you want visible, rinse and repeat until you have a short animation that is long enough not to look too obviously repeating ( I did it for about 15 frames ); then go back and do the same thing in reverse to add another 15 frames ( this is to get the seamless “looping” action ). Here is a straightforward tutorial: http://psd.tutsplus.com/tutorials/tutorials-effects/how-to-animate-a-gif-inside-of-photoshop-cs4/
After this I also went through each layer and adjusted colouring, tones, and saturations ( use an action for this to save time and be consistent ). Also threw an old paper texture as top layer ( blendmode set to multiply) to get the “old look”, crop[out our dog’s foot in corner] and tada! almost done.
Step 8:
File > Save for Web and Devices as a GIF and fine! You should now have your own subtle GIF.
Some Tips from some fellow Redditors ( for best results ):
- Should selectively narrow the color palette BEFORE you compress the image into a gif. That will let you control any color banding that may happen when working with only 256 colours.
- For better quality you may want to use an animated PNG ( instead of a .gif) though not all browsers support them requiring a Flash fallback.
- Match the frame rate of your input video with your output sequence. You probably won’t notice the difference between 29.97 fps and 30 fps (as is the case here), but for European users, the difference between 25 fps and 30 fps is very much noticeable. And a bi*** to correct afterwards.
Comments
tinko
May 4, 2011 at 6:14 amThanks for taking the time to show how this gif animation is done!!
anthonyScavarelli
May 4, 2011 at 7:11 amYou’re welcome. Hopefully it is helpful.
Nacho MG
May 15, 2011 at 10:33 amHe hecho este tutorial sobre como hacer un cinemagraph, pero con Photoshop en castellano y un poco a mi manera (que seguramente no es la más correcta, pero sigue siendo sencilla). 🙂
http://www.nachomg.com/dibujanteaspirante/tutorial-cinemagraph-photoshop/
¡Great Work, but i prefer Photoshop!
anthonyScavarelli
May 15, 2011 at 4:48 pmAh nice! I didn’t even know you could open a video with photoshop though unfortunately it wouldn’t open the file I got off my camera. Good link though – many ways to approach it!
Joe
May 25, 2011 at 7:19 amDo you find that keeping the frame rate set to 30FPS brings up the filesize? I used something like 12 FPS. When using more frames the final image was in the mega bytes and not kb like it needs to be. Was just curious in that regard. Some of these cinemagraphs on other sites look pretty smooth. I wonder how many frames of animation they are and what FPS was used.
anthonyScavarelli
May 25, 2011 at 7:36 amI suppose it is all relative to what one defines as large. In the end all that matters is how many frames you are using. Using 24 frames at 30fps is the same as using 24 frames at 12fps. This clip didn’t need to be too long and I figured under 0.5Mb was acceptable. Saving with less colours could have also helped the download size.
Now if the loop needed to be a longer duration that 30 frames total than I would have to look at lowering the framerate and/or removing more colours to remain at a smaller download size.
rasha
May 29, 2011 at 7:01 pmi loved your work sooo much … but i’m not good at adobe bridge Adobe Premiere i can work on adobe photoshop … so please can you do this tutorial by video 🙂
thnx
anthonyScavarelli
May 30, 2011 at 7:36 amThanks Rasha, I will look into something like that if I have time. Maybe if there is some specific problem you are having I can clear it up?
inspirationfeed
July 6, 2011 at 8:04 amAwesome tutorial!
Helen
July 6, 2011 at 5:44 pmStep two and the purchase of Premiere is not necessary. Import the frames directly from the camera into Photoshop.
It can be a film, but it can be normal RAWs to.
anthonyScavarelli
July 7, 2011 at 11:11 amYup that is very true. I have seen a couple of other tutorials go this route. For me I chose Premiere as it allowed me to quickly identify and extract a few frames from a few minutes long video – to each their own.
Fessols&Naps
July 7, 2011 at 1:21 pmnew tutorial video about cinemagraphs, if you would like to check it:
http://fessolsnaps.wordpress.com/2011/06/14/tutorial-para-crear-cinemagraphs/
This format have great potential.
Fessols&Naps
July 18, 2011 at 6:33 amupdated info in our post about cinemagraphs.
zouxi
September 21, 2011 at 10:30 amI am a Chinese, my English is not very good, I want to learn the technology, who can help me? Thank you.My name is (dswyyzcn520@hotmail.com)
KeithFromCanada
September 23, 2011 at 4:10 amOne trick you can use with GIF’s is to subdivide the image, place each section in its own frame, then reduce the colors to 255 (leaving 1 for transparency), saving a separate palette for each frame. I wrote a short script once to turn any 24bit JPEG/etc. into a 24bit GIF. With some care, you can completely eliminate banding without growing the file size too much.
Stephen
October 16, 2011 at 6:53 pmHi, do you ever take on cinemagraph work as a commission. I’d like to give some for Christmas presents but I don’t have the time to learn how to do this by then. I would be happy to take any footage you require. Thanks!
United By Photography
October 17, 2011 at 3:12 pmHi Anthony love the article coverage give to cinemagraphs on your blog and the screenshot tutorial.
Steve
November 3, 2011 at 8:12 amHi Anthony, this tutorial rocks!
One question… can you give me the link of the video you used? Thanks!
temo
January 4, 2012 at 12:08 pmHi anthony, we’ve built an iphone app that makes it ridiculously easy to create cinemagraphs – wld you be interested in beta testing it? Pls contact me at temo(at)factyle(dot)com
Alex Nautilus
August 18, 2012 at 7:38 pmA modern way to create subtle GIFs is through Microsoft Cliplets, juxtaposing still and dynamic imagery. Take a look http://research.microsoft.com/cliplets/
Bye,
Alex Nautilus
Anthony
August 19, 2012 at 5:40 pmThanks for the suggestions. This article is definitely out of date and there are many others, even apps now, that make this process easier. This happened to be the way I figured it out.
Shimmer
August 28, 2012 at 9:00 pmThanks very much Anthony. I remember reading this instructional about a year ago and it’s still relevant a year later.
Anthony
August 29, 2012 at 3:08 amYour welcome Shimmer. I am glad it can helpful.
Gary B
June 27, 2013 at 5:09 pmStep 1) Get Giffer: http://giffer.co/
Step 2) Hold the phone still, record your scene.
Step 3) Play it back and tap the hand icon.
Step 4) Draw on the screen.
Step 5) Tap Finish
Tada!! Pretty cool app.
Centrifuga
October 4, 2014 at 11:25 pmNice tutorial. I’ll try your way as soon as possible.
Thanks,
Sara